

Make DIY Cookie Paint with Marshmallows
Another week of trying to figure out ways to entertain these kids. Don’t they know mommy is tired????
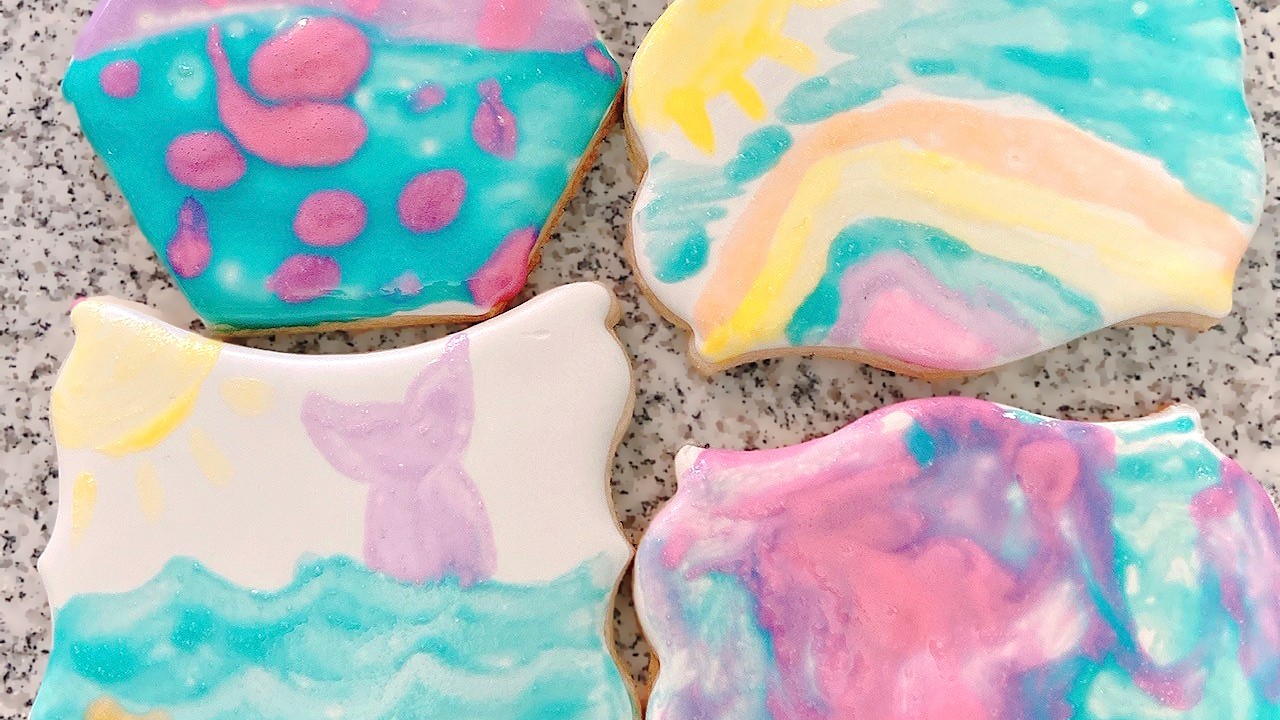
I made and flooded cookies this week, but I must have been having an off day, because I had several that came out wonky. Runny icing, air bubbles, cratering. The trifecta.
If you’re a cookier, I’m sure you’ve know what I’m talking about. If you’re not a cookier....well, you probably wouldn’t have noticed anything, but I did, and that’s what mattered here.
My kids are always asking to help me decorate cookies, so I thought this would be an easy way to throw them a bone while also using up my mistake cookies.

I had read a while back about a simple way to use marshmallows to make edible paints, so we decided to try our hand at it. It was so easy (and delicious!), and the kids wanted to keep painting long after my cookie catastrophes were gone. So I popped open the tub of plain sugar cookies I had bought at the store last week (sacrilege, I know, but a momma’s gotta do what a momma’s gotta do), and we painted on those as well.

Ingredients:
- 15 regular-sized marshmallows (not minis)
- 1/4 cup water
- 3 Tablespoons light corn syrup
- Food coloring
- Mini paintbrushes (or something to “paint” with—Maddie was using her fingers at one point 🤷🏻♀️)
- Cookies, iced or plain (it works better if there’s not a lot of loose sugar on top, though)
Directions:
- Place marshmallows in a microwave-safe bowl and microwave for 30 seconds.
- Add water to the melty marshmallows and stir. Pop the bowl back in the microwave for another 30 seconds, and stir again for a minute or two. If you still have chunks of unmelted marshmallow, microwave for another 15 seconds or so.
- Stir in the corn syrup until everything is nice and smooth. Separate into bowls and add a drop of food coloring to each bowl. Stir, then paint cookies!

Sophie was more precise with her painting, while Maddie went full-on finger paints. Soph also decided to try a pour technique towards the end, when the paints were running a little low.
The kids were really only restrained by their level of imagination and how sticky exactly I was willing to let my kitchen (and them) become 😂
Storing this Icing:
This paint will remain sticky for a couple of days! So it's best eaten right away.
You can store this paint in the fridge, in an airtight container, for a couple of days. You may need to microwave it again for 5 seconds at a time, stirring in between.
Recommended for You:


Original price
$ 1.99
-
Original price
$ 1.99
Original price
$ 1.99
$ 1.99
-
$ 1.99
Current price
$ 1.99
Piping Bag Tip Tube Covers - Set of 4
Ateco
in stock
Don't let your icing bags leak or dry out! Use these covers on bags with Ateco couplers and standard tips on them. Reuse them again and again. Se...
View full details
Original price
$ 1.99
-
Original price
$ 1.99
Original price
$ 1.99
$ 1.99
-
$ 1.99
Current price
$ 1.99


Original price
$ 1.99
-
Original price
$ 9.95
Original price
$ 1.99
-
Original price
$ 9.95
Original price
$ 1.99
$ 1.99
-
$ 8.95
$ 1.99
-
$ 8.95
Current price
$ 1.99
Black Fine Tip Food Marker
The Cookie Countess
in stock
A black edible-ink pen is essential for your decorating kit. Use these high quality markers for: Marking up baked cookies for planning designs Wr...
View full details
Original price
$ 1.99
-
Original price
$ 9.95
Original price
$ 1.99
-
Original price
$ 9.95
Original price
$ 1.99
$ 1.99
-
$ 8.95
$ 1.99
-
$ 8.95
Current price
$ 1.99
Save up to 10%


Original price
$ 23.99
Original price
$ 23.99
-
Original price
$ 23.99
Original price
$ 23.99
Current price
$ 17.99
$ 17.99
-
$ 17.99
Current price
$ 17.99
Stainless Steel Measuring Cups 4 Piece Set
The Cookie Countess
in stock
Incredibly high quality, with no plastic parts. Whether baking or cooking you'll reach for these essentials again and again! THESE ARE THE LAST SET...
View full details
Original price
$ 23.99
Original price
$ 23.99
-
Original price
$ 23.99
Original price
$ 23.99
Current price
$ 17.99
$ 17.99
-
$ 17.99
Current price
$ 17.99
Save 25%


Original price
$ 8.99
-
Original price
$ 8.99
Original price
$ 8.99
$ 8.99
-
$ 8.99
Current price
$ 8.99
Instant Royal Icing Mix - White Base
The Cookie Countess
in stock
Just add water for white, stiff icing! Perfect for stenciling, dots and eyes, writing, or thin it for flooding. You can tint it any color you need...
View full details
Original price
$ 8.99
-
Original price
$ 8.99
Original price
$ 8.99
$ 8.99
-
$ 8.99
Current price
$ 8.99


Original price
$ 6.99
-
Original price
$ 6.99
Original price
$ 6.99
$ 6.99
-
$ 6.99
Current price
$ 6.99
Cookie Order Form 5 x 7, 50 sheets
The Cookie Countess
in stock
These cute sheets will help you plan your cookie orders. The back has an area for sketching and pricing planning. Size: 5" x 7" 50 Sheet Pad Doub...
View full details
Original price
$ 6.99
-
Original price
$ 6.99
Original price
$ 6.99
$ 6.99
-
$ 6.99
Current price
$ 6.99
-

Decorating a Vintage Heart Cake Cookie
Read nowYou've probably noticed that vintage heart cakes are having a MOMENT. It seems like everywhere you look, you'll see adorable heart cakes with fluffy borders, ruffles and swooshes and bows and cherries. The more ornate, the better. What's old is...
-
How To Make Cookie Moss!
Read nowAfter posting my recent blog about how to make ribbon bows, I had lots of questions about how I made the moss bunny. And I am at your service! So here are step by step instructions on how to make...
-

Ribbon Bows - Everything you need to know!
Read nowUnless you've just returned from a deserted island, you've probably noticed that ribbon bows have taken over cookie decorating. And I am TOTALLY here for it! Ribbon bows are the perfect sweet and girlie touch for so many designs and...


Leave a comment